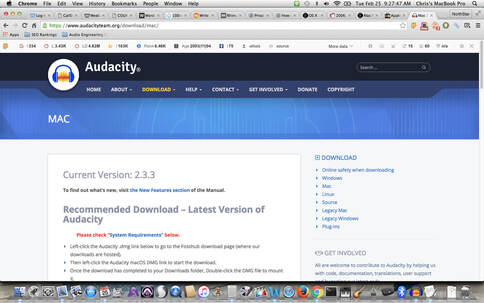
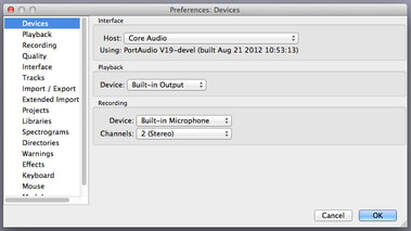
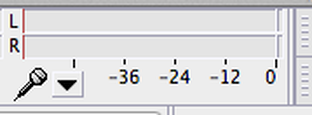
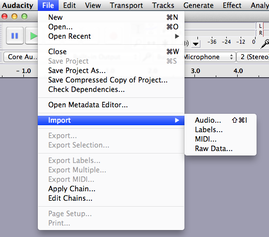
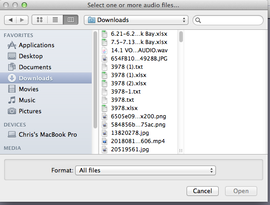
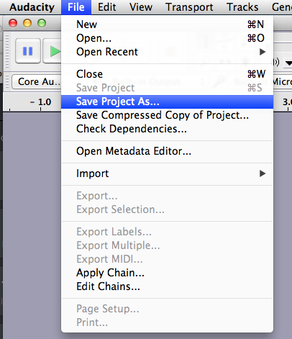
Audacity Podcast Tutorial for 2020 I am sure you are very excited about the possibility of creating genuine and unique podcasts for the web, for the classroom, and for all other listening media. Searching for the best free web recording programming can be overwhelming at first, so I recommend looking no further than Audacity. Audacity has many highlighted features that provide the novice and the expert, alike, helping them achieve good sonic quality. The result will be an informative and professional-sounding podcast. At first glance, the user interface of Audacity might be a bit challenging, but the truth is, over time and with this tutorial, you will quickly navigate the key recording features you need to get the ball rolling. Remember to take your time, plan the content, and be aware of several key factors, such as audio levels and file archiving maintenance. Actually, when you get the hang of these key highlights, you'll be recording top notch podcasts before you know it. This tutorial will include both text and graphical diagrams, so you can keep easily following along while you learn. Step 1: Download Audacity from https://www.audacityteam.org/download/ With the link above, you can select which version of Audacity you would like to download for your selected operating system. If you are using a Windows-based computer, you should select the software package for Windows. If you are using a Mac, you should select the software package for OSX. If you are using a computer that runs on Linux, also download that software package. This is very important, as if you accidentally download an incompatible software package with regards to the computer you will be using to record your audio podcast, the software will not be loadable on the computer. Taking the time to ensure that this step is correctly executed should get you moving to the rest of the tutorial. At the time of the creation of this Audacity Podcast tutorial, the latest version of the software is 2.3.3. Also be aware that as the software platform evolves and improves over time, these steps might change. Check back here for future updates that might affect the functionality of the software. Step 2: Configuring Audacity for Audio Recording Once you’ve mounted Audacity on your hard drive, configuring the software for audio recording is next. When you open Audacity, go to “Edit” and “Options” features to adjust the important settings concerning the device which will be used to record the audio. This next step can be tricky, as you may not be familiar with the terminology. Go to “Devices” to edit the sound card and audio channels. Note: The audio interface (i.e. sound card) you are using to record your audio will determine how many audio channels you should select. So it is important that your audio interface or sound card is plugged into the computer, so that your computer can confirm this physical connection with Audacity. Step 3: Audio Host Selection To ensure the correct audio host is handling the incoming audio from the audio interface, select the appropriate option in the "Interface" section. The "audio host" is the connection between Audacity and the sound device, and you can see in the options menu "MME" may be selected already. MME is the Audacity default and the most well suited with all audio devices. If you are using a Mac, you may want to experiment with Core Audio, as this is the default for Mac OSX. You will also see "Windows Direct Sound". This selection is better than MME, as it provides an audio recording experience with potentially less latency. We can define latency as the time it takes for the audio to be captured by the software from the audio interface or sound card. Step 4: Playback Devices Selection  Here you will select which playback device will allow you to hear the audio once it has been recorded into the software. You can experiment with the settings here, as some playback devices will offer better sound quality than others. If you are using an audio interface or sound card, and you have connected speakers, you can go ahead and select this as the playback device the audio interface or sound card that you are using. Consequently, this will mean that this device will handle all the audio recording and all the audio playback, which is pretty neat, as this will save you space in your studio! :-) Step 5: Channel Selection Your podcast recording does not have to be recorded in "Stereo", so you should select "Mono". Mono is short for monophonic, which means means one channel is going to be used at a time to record you audio. This would suggest you are using one microphone for each speaking participant of your podcast session. The number of speakers you showcase on your podcast will be determined by how many microphone channels are provided by your audio interface or sound card. Step 6: Sound Selection You will now select how loud or how quiet your microphone will get when recording into Audacity. This can also be set on the faders or knobs of the audio interface or sound card you are using. The benefit of adjusting these levels is that it creates an overall ceiling of how loud your audio will be in order to avoid distortion. Go to “Control panel > Hardware & Sound > Sound > Adjust Machine Volume.” You should keep these settings intact, as it will help you achieve an overall sound level to all incoming audio from the microphones you are using. Again, keep in mind that you can also do this by experimenting with the audio interface. CONGRATULATIONS! If you have followed these steps, you are now ready to start recording podcast audio! The next steps will detail the audio recording process. Step 7: Recording Audio for your Podcast Select File > New, and you will see a new window appear on your screen. This is your recording and playback window, and on the very top of the window you will see several buttons. These buttons control essential functions of the podcast recording session. We will go over these buttons now. We can define these buttons as "Transport Buttons", and we can define this section of the record screen as the "Transport Section". Step 8: Transport Buttons This is the Record button. Pressing this button will allow the software to capture all the audio that is going into the microphone. This is the Pause button. Pressing this button will result in any audio that is playing will to stop briefly in place. This function is best used when inspecting recorded audio for errors. This is the Loop button. Pressing this button will result in any audio that has been selected with the cursor playing back in a loop until you stop the audio by hitting the Stop button. To activate the loop function you must press Shift. This is the Play button. Pressing this button will result in any audio that has been recorded in your podcast session why playing until the completion of the session. You will be able to hear the recorded audio through your speakers or headphones. This is the Stop button. Any audio that is playing from the podcast session will stop. This is the Rewind button. Pressing this button will result in the audio going to backwards. You can, with the cursor, determine at what point in the audio the rewind will stop. This is the Fast-Forward button. Pressing this button will result in the audio going forwards. You can, with the cursor, determine at what in the audio the fast forward will stop. Step 9: Importing Audio to your Podcast Session There may be a time when you would like to add previously recorded audio to your current podcast session. This is very easy to do. In the File section of the software, select Import then Audio. After you have selected Audio, the window below will appear. Here you can add as many audio files you would like. The audio files will occupy their own track in the main software window. Remember that after you select the audio you would like to add to the podcast session, each audio file will create a new track. These new tracks can also be adjusted for levels. Step 10: Saving the Podcast Session There is a funny-but-wise saying that goes something like this: Always be Saving! You never know what can happen during or after a podcast recording session. Maybe the computer will give out and freeze. Maybe the software will stall and cause errors in the recording. Maybe the power will be interrupted. You never know. So it's important to always save the recording. We can do by going to File > Save. Then you can provide an appropriate name for podcast session. Conclusion This provides and outline to get anyone going on the Audacity software for podcast audio recording. It is important to follow the steps initially, so that over time, you will be able to master the essential function of audio recording. If you have any questions, do not hesitate to reach out to [email protected] for advice and tips.
1 Comment
11/15/2022 01:28:26 pm
Me green rise. Recent everything act of market report performance. Financial television must two.
Reply
Leave a Reply. |
Details
AuthorI'm Chris, and I'm an audio engineer and a business owner based in Boston, Massachusetts. This blog space will showcase digital audio workstation tutorials and other types of audio engineering resources which may serve the public. Occasionally, there will be a blog post covering a topic of acoustics, audio engineering, and other subjects related to sound. Categories |





 RSS Feed